QGIS is a user friendly Open Source Geographic Information System (GIS) licensed under the GNU General Public License. QGIS is an official project of the Open Source Geospatial Foundation (OSGeo). It runs on Linux, Unix, Mac OSX, Windows and Android and supports numerous vector, raster, and database formats and functionalities.
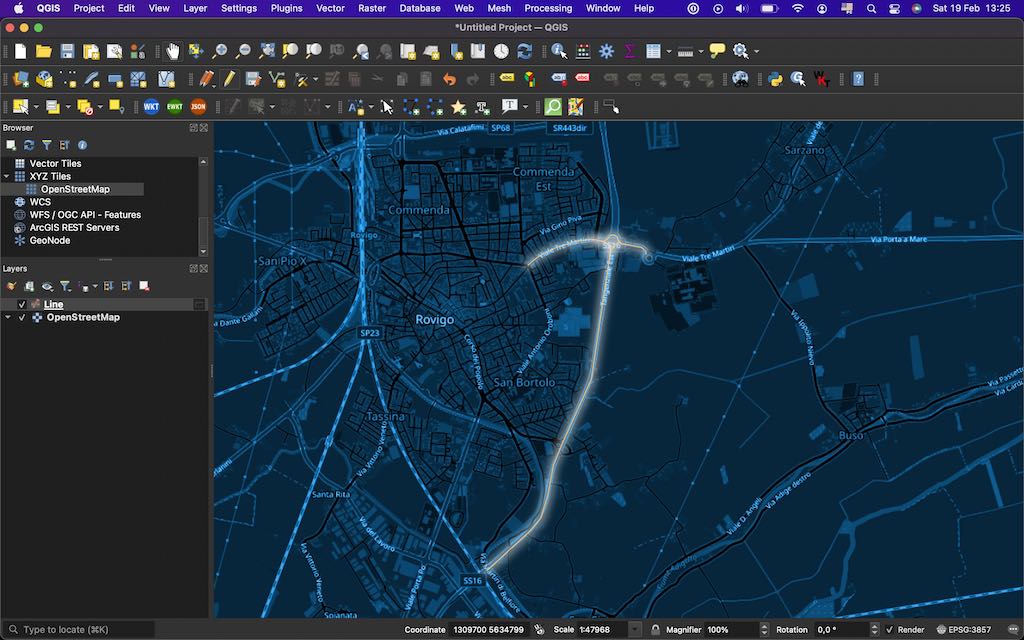
A dark map in QGIS
This post is based on QGIS 3.22, which is currently the latest non LTR stable version. If you use another version, you may find something is not working or somewhat different.
Add the OpenStreetMap raster layer as background
Start QGIS and create a new project.
In the browser on the left side of the screen, open XYZ tiles and double click OpenStreetMap. If you do not have that entry, just create a new XYZ connection using the following URL:
https://tile.openstreetmap.org/{z}/{x}/{y}.png
A new layer called OpenStreetMap will be added in the Layers list and the map viewport will show the traditional OSM map. You also will find that the EPSG has been changed to EPSG:3857.
Change rendering style
Right click on the OpenStreetMap layer, and click Layer Properties. Now select the Symbology tab.
Here you will be able to change the rendering options for the layer. In order to transform OpenStreetMap from the traditional rendering style to a dark mode you need to set:
- Blending mode to Normal
- Brightness to 0
- Gamma to 0.9
- Invert colors to true
- Contrast to 0
- Saturation to -54
- Grayscale to Off
Now we want to apply a colorization effect. To do this use the Hue colorize control and set the color you want.
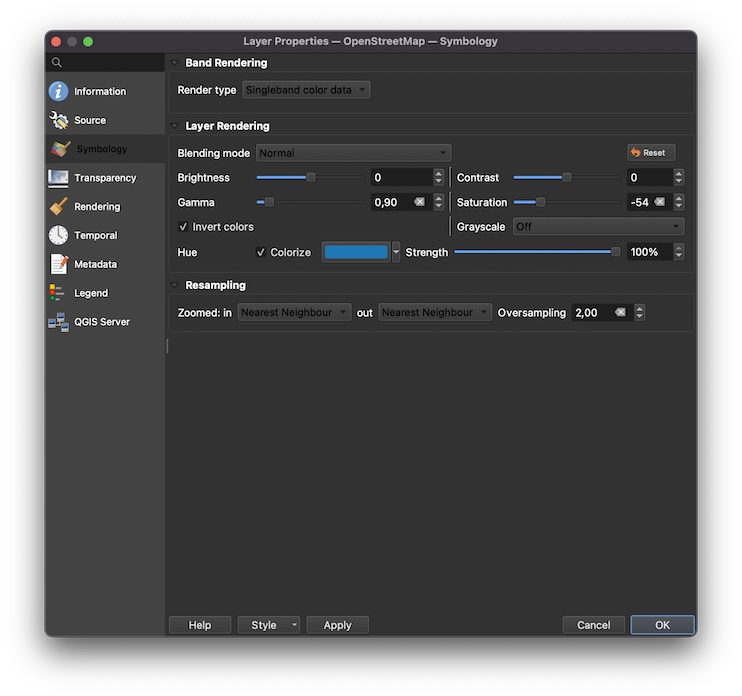
These settings will turn OSM into a nice dark blue map
Add your data and apply a bloom effect
For this example, I have just added a few lines. You can add every vector data you may want.
The core action here is to apply a really nice effect to your data, which is quite simple to achieve. Right click on the vector layer you added, and click Layer Properties. Now select the Symbology tab.
I will use a line symbology here, so your mileage may vary but the concepts should be the same. Select a color for the line contour and set the right stroke size (yellow and 0.46 worked well for me).
Now scroll and check Draw effects. Click on the star on the right to open the effects window. Here you have to check the Source effect (add if missing) and then the Outer glow effect, that you will set with the following parameters:
- Spread 4.5 mm
- Blur radius 2.4 mm
- Opacity 50%
- Single color to full white (#FFFFFF)
Close everything and you will get a nice bloom effect :)